You can create a workflow's schema in the workflow editor. The workflow schema contains the elements that the workflow runs and determines the logical flow of the workflow.
Prerequisites
Complete the following tasks.
Procedure
1 | Click the Schema tab in the workflow editor. |
2 | From the Generic menu, drag a decision element to the arrow that links the Start element and the End element in the schema. |
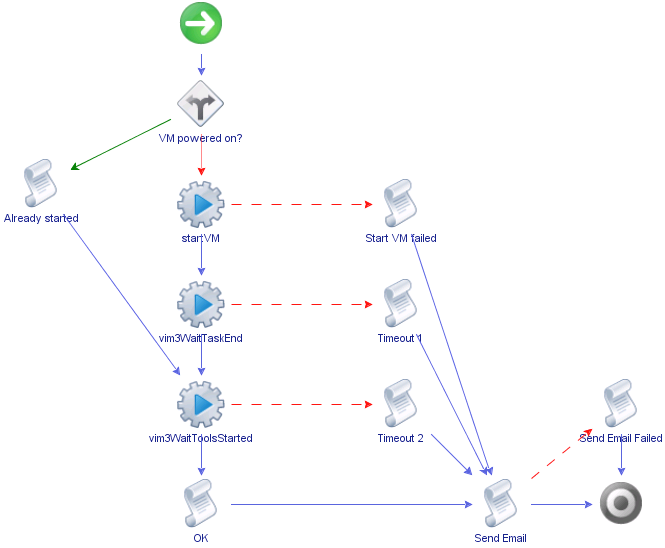
3 | Double-click the decision element and change its name to VM powered on?.
The decision element corresponds to a boolean function that checks whether the virtual machine is already powered on.
|
4 | From the Generic menu, drag an action element to the red arrow that links the decision element and an End element.
The dialog box for action selection appears.
|
5 | Type start in the Filter text box, select the startVM action, and click Select. |
6 | Drag the following action elements, one after the other, to the blue arrow that links the startVM action element to an End element.
|
vim3WaitTaskEnd
|
Suspends the workflow run and pings an ongoing vCenter Server task at regular intervals, until that task is finished. The startVM action starts a virtual machine and the vim3WaitTaskEnd action makes the workflow wait while the virtual machine starts up. After the virtual machine starts, the vim3WaitTaskEnd lets the workflow resume.
|
|
vim3WaitToolsStarted
|
Suspends the workflow run and waits until VMware Tools starts on the target virtual machine.
|
|
7 | From the Generic menu, drag a scriptable task element to the blue arrow that links the vim3WaitToolsStarted action element to an End element. |
8 | Double-click the scriptable task element and rename it to OK. |
9 | Drag another scriptable task element to the green arrow that links the VM powered on? decision element to an End element , and name this scriptable task element Already started. |
10 | Modify the linking of the Already started scriptable task element. a | Drag theAlready started scriptable task element to the left of the startVM action element. |
b | Delete the blue arrow that connects the Already started scriptable task element to an End element. |
c | Link theAlready started scriptable task element to the vim3WaitToolsStarted action element with a blue arrow. |
|
11 | From the Generic menu, drag the following scriptable task elements into the schema.
■
|
Drag a scriptable task element to the startVM action element and name the scriptable task element Start VM Failed.
|
■
|
Drag a scriptable task element to the vim3WaitTaskEnd action element and name the scriptable task element Timeout 1.
|
■
|
Drag a scriptable task element to the vim3WaitToolsStarted action element and name the scriptable task element Timeout 2.
|
■
|
Drag a scriptable task element to the blue arrow that links the OK scriptable task element to an End element, name the new scriptable task element Send Email, and drag it to the right of the OK scriptable task element.
|
■
|
Link the Start VM Failed, Timeout 1, and Timeout 2 scriptable task elements to the Send Email scriptable task element with blue arrows.
|
■
|
Drag a scriptable task element to the Send Email scriptable task element, name the new scriptable task element Send Email Failed, drag it to the right of the Timeout 2 scriptable task element, and link it to the End element with a blue arrow.
|
|
12 | Drag the End element to the right of the Send Email scriptable task element. |
13 | Click Save at the bottom of the Schema tab. |
The following figure shows the layout of the Start VM and Send Email workflow schema elements.
Linking the Elements of the Start VM and Send Email Example Workflow
What to do next
You can highlight different zones in the workflow.